Why Preventing Edits Matters
Shared Google Sheets are the backbone of team workflows. Project trackers, budget spreadsheets, inventory lists, client databases: they all live in Google Sheets because the collaboration is seamless. But that same openness is also the biggest risk. One accidental deletion, one misplaced paste, one well-intentioned but incorrect edit, and your data integrity is compromised.
The good news is that you do not need to be a developer to prevent unwanted edits. Google Sheets offers several native protection features, and add-ons like SheetGuard extend those capabilities further. Let us walk through every no-code method available, from simplest to most powerful.
Method 1: Change Sharing Permissions
Share as Viewer or Commenter Native
The simplest way to prevent edits is to share the sheet with "Viewer" or "Commenter" access instead of "Editor." Click the Share button in the top right and set the access level for each person or group.
Best for: People who only need to read the data. Not useful if the person needs to edit some cells but not others.
This is often the first approach teams try. It works when you have a clear separation between people who read and people who write. But most real-world scenarios are more nuanced. Your team members need to edit their own rows while being prevented from touching completed records or columns managed by someone else.
Method 2: Protect Sheets and Ranges
Data > Protect sheets and ranges Native
Google Sheets lets you protect an entire sheet or a specific cell range. Go to Data > Protect sheets and ranges, select the area you want to lock, and choose which users can still edit it. Everyone else will see a warning or be blocked from editing.
Best for: Locking header rows, formula columns, or reference data that should never change.
This is Google Sheets' primary protection mechanism, and it covers a wide range of use cases. Here is how to set it up step by step:
- Select the cells, column, or row you want to protect.
- Go to Data > Protect sheets and ranges.
- Click Add a sheet or range.
- Give it a description (for example, "Header Row" or "Budget Formulas").
- Click Set permissions.
- Choose either "Only you" or "Custom" to select specific editors who can modify the protected range.
Limitations of Range Protection
While range protection is useful, it has significant constraints that become apparent in dynamic workflows:
- Static ranges only. You protect a fixed range like A1:Z10. When new rows are added below row 10, they are not automatically protected. You need to update the protection manually.
- All-or-nothing. Every cell in the protected range is locked for the same set of users. You cannot say "lock row 5 but not row 6" within the same protection rule.
- No conditional logic. The protection applies regardless of cell values. You cannot create a rule like "protect this row only when Status equals Complete."
- Manual maintenance. As your sheet grows and your team changes, you need to manually update protections. This is error-prone and time-consuming.
Method 3: Lock the Entire Sheet with Exceptions
Protect full sheet, then exclude ranges Native
Instead of protecting specific ranges, protect the entire sheet and then add exceptions for the ranges you want people to edit. This "default locked" approach is safer because new columns and rows are automatically protected.
Best for: Sheets where most data should be read-only and only a few input cells need to be editable.
This inverted approach is often better than protecting individual ranges, because it handles new rows and columns automatically. Here is how:
- Go to Data > Protect sheets and ranges.
- Choose the Sheet tab instead of Range.
- Select the sheet you want to protect.
- Click Except certain cells and add the ranges you want to leave editable.
- Set permissions to control who can edit the unprotected areas.
This works well for form-like sheets where users fill in specific input cells and the rest is calculated or reference data. But it still does not solve the conditional protection problem: you cannot make protection depend on what is already in the cells.
Why Apps Script Is Overkill for Most Teams
At this point, many guides will tell you to open the Apps Script editor and write a custom onEdit function. Here is a typical example:
var sheet = e.source.getActiveSheet();
var row = e.range.getRow();
var locked = sheet.getRange(row, 6).getValue(); // Column F
if (locked === "Locked") {
e.range.setValue(e.oldValue); // Revert the edit
SpreadsheetApp.getActiveSpreadsheet()
.toast("This row is locked.");
}
}
This looks straightforward, but in practice it creates more problems than it solves for non-technical teams:
- Someone has to write and maintain it. When the person who wrote the script moves to a different team or leaves the company, the remaining members are stuck with code they do not understand. Modifying it to handle new requirements requires JavaScript knowledge.
- Simple triggers have limited permissions. The
onEditsimple trigger runs as the editing user, which means it cannot access services that require authorization. To usee.oldValuereliably or manage protections, you often need an installable trigger, which requires manual setup. - It does not handle multi-cell edits well. When someone pastes multiple rows,
e.oldValueis undefined. The trigger receives a range object, but you need to iterate through every cell and compare with the previous values, which you do not have easy access to. - Execution quotas apply. Google Apps Script has daily execution limits. In a heavily used sheet, your protection script could hit the quota and stop working without warning.
- Debugging is difficult. When something goes wrong, the only way to diagnose the issue is through the Apps Script editor's execution log, which most team members will never open.
The Hidden Cost of Script-Based Protection
A script that works today can silently break tomorrow. Google updates Apps Script runtime behavior, your sheet structure changes, or the trigger owner loses access. There is no monitoring or alerting built in, so you may not discover the protection has stopped working until data has already been corrupted.
Method 4: No-Code Conditional Protection with SheetGuard
SheetGuard Add-on Add-on
SheetGuard is a Google Sheets add-on that provides conditional cell locking and data validation through a visual sidebar interface. No code is required. Rules are enforced in real time with automatic revert on violations.
Best for: Teams that need conditional protection (lock rows based on cell values), required field enforcement, and bulk paste validation without any scripting.
SheetGuard sits between native protection (too rigid) and Apps Script (too complex). It gives you the conditional logic of a script with the ease of a built-in feature. Here is what makes it different:
Invalid edits are automatically caught with clear error messages
Visual Rule Builder
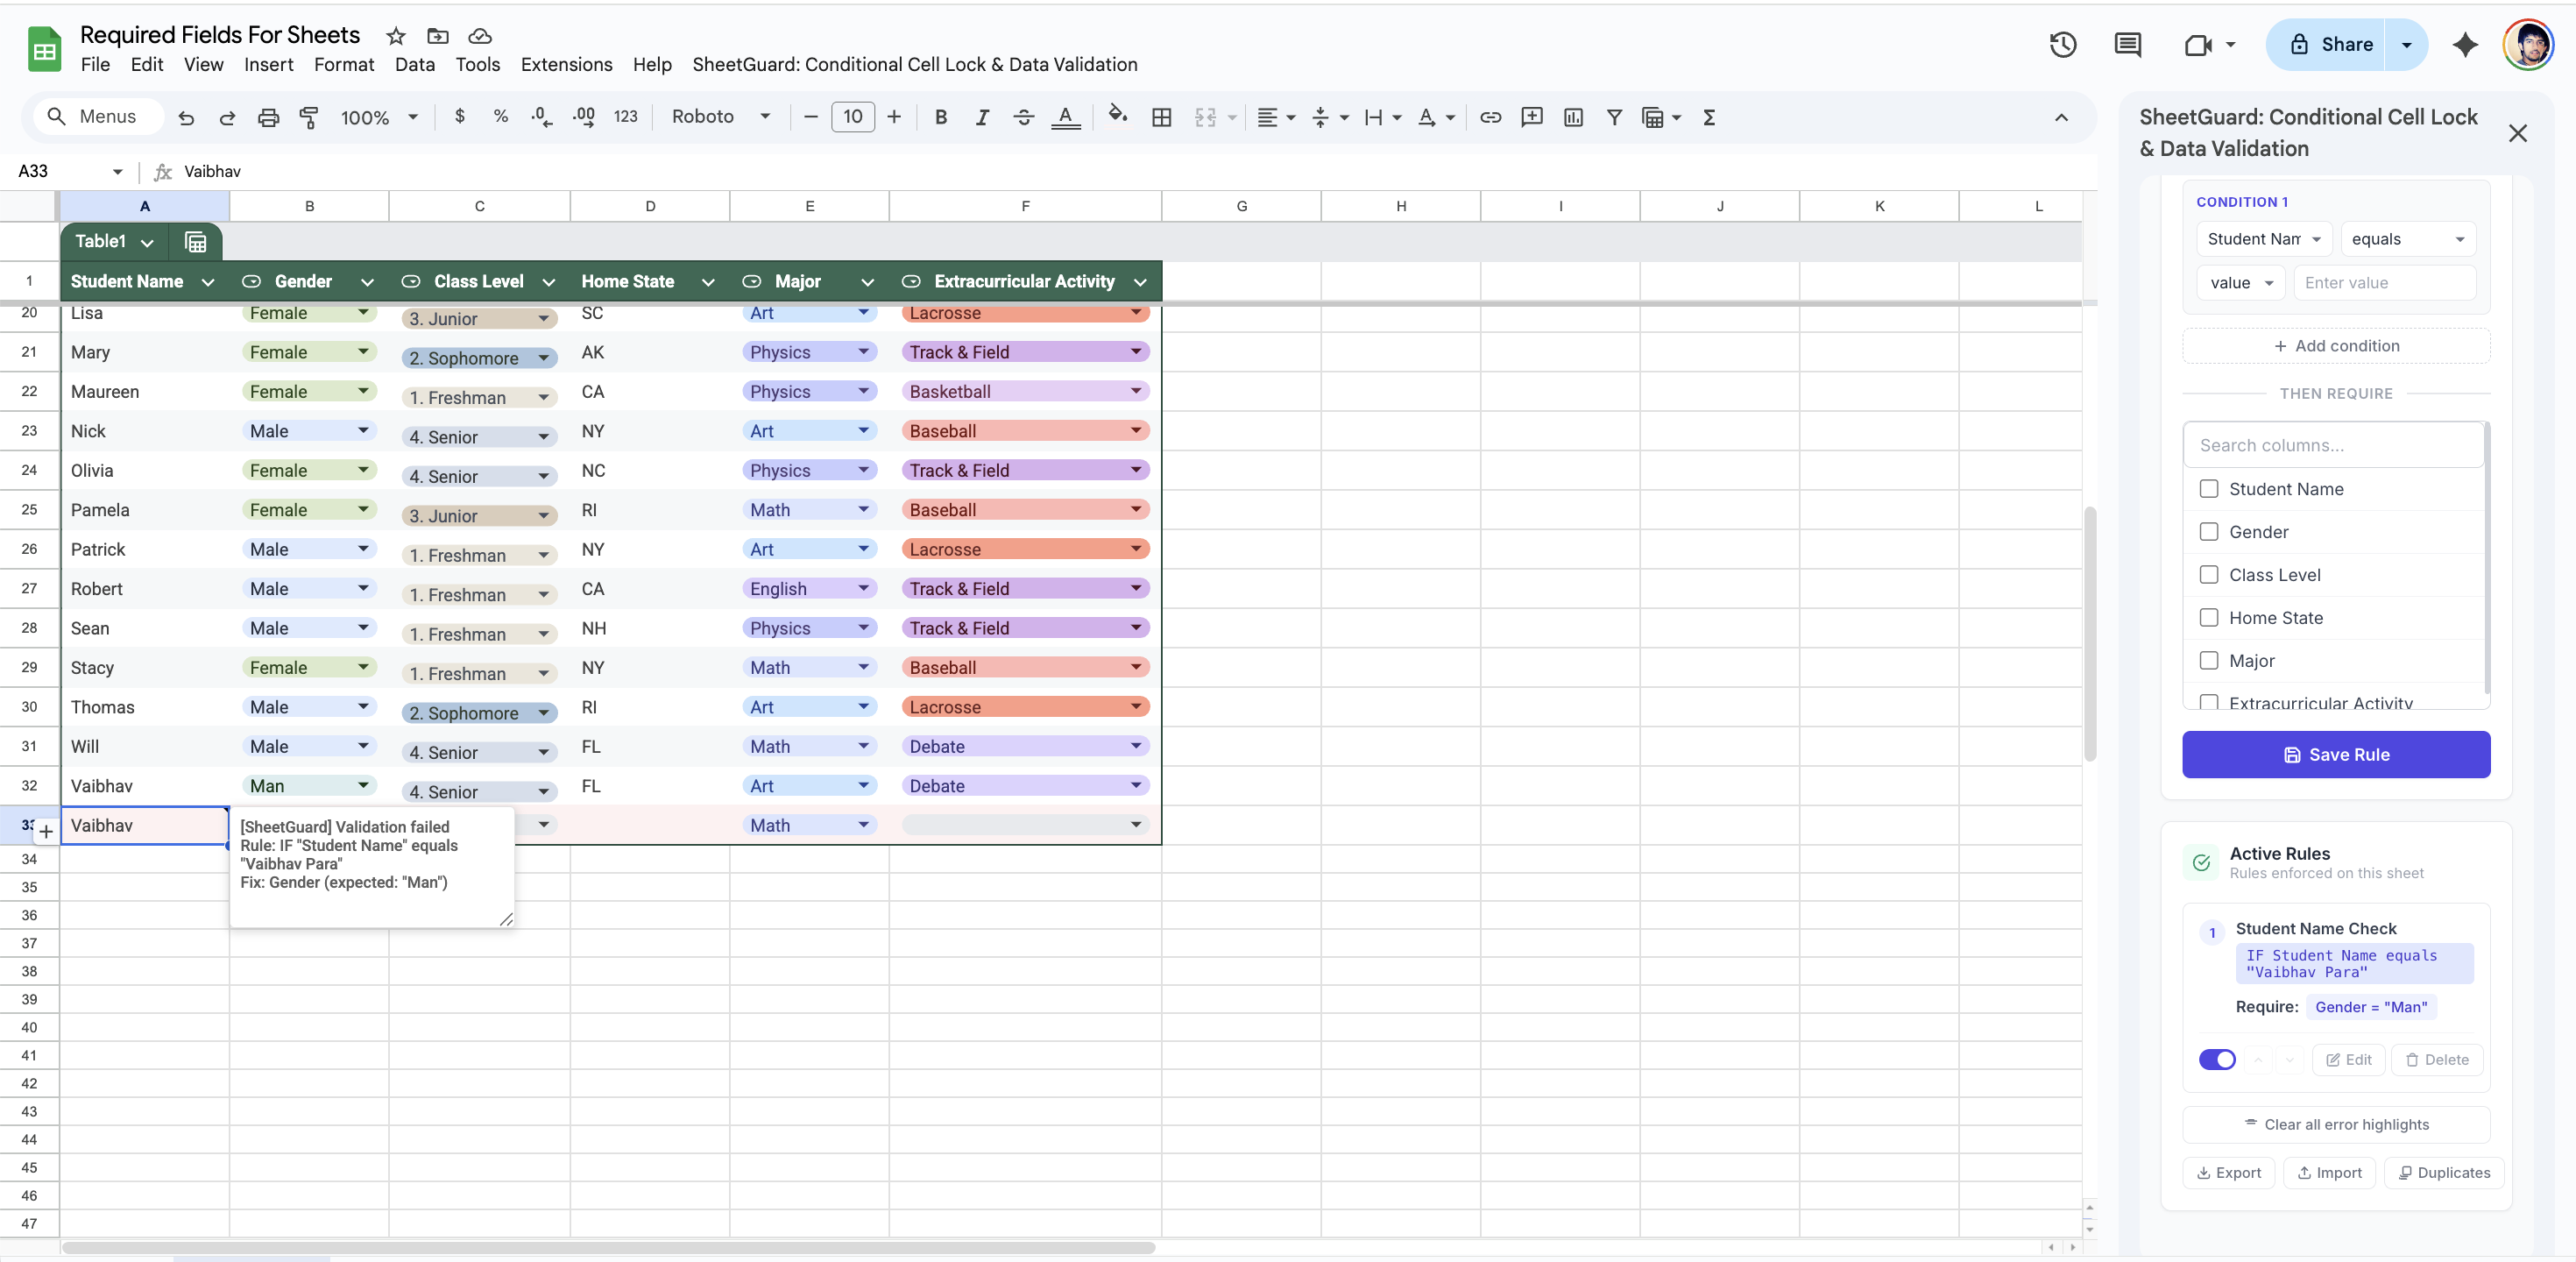
Instead of writing code, you create rules through SheetGuard's sidebar. Select a column, choose a condition operator (equals, not empty, greater than, contains, etc.), set the value, and define what should happen when the condition is met. The entire setup takes under two minutes.
Real-Time Enforcement
When a user makes an edit that violates a rule, SheetGuard instantly reverts the change. The user sees a toast notification explaining why the edit was rejected. There is no delay, no race condition, and no way to bypass it by editing quickly.
Bulk Paste Validation
One of the biggest gaps in both native protection and Apps Script solutions is handling bulk pastes. SheetGuard validates pasted data row by row. Rows that violate rules are highlighted with a red background and an error note is added to cell A of each violating row. The data stays in place so the user can fix it or undo the paste.
Owner-Only Rule Management
Only the spreadsheet owner can create, modify, or delete SheetGuard rules. This is enforced at the add-on level, meaning other editors cannot alter the protection logic. They see a "View only" banner in the sidebar and experience rule enforcement on every edit they make.
Setting Up SheetGuard: A Quick Walkthrough
Here is how you would prevent edits on rows where Status = "Complete" using SheetGuard:
- Install SheetGuard from the Google Workspace Marketplace. It takes about 30 seconds and requires standard add-on permissions.
- Open the sidebar by going to Extensions > SheetGuard > Open Sidebar.
- Create a new rule. Click "New Rule" and set the condition: IF Status equals "Complete".
- Set the requirement. Choose which columns must have specific values, or simply use it to lock cells based on value. For example, you can require that the "Reviewed By" column is not empty before Status can be set to "Complete."
- Save and test. Try editing a row where Status is "Complete." SheetGuard will revert the change and show you a message explaining why.
Free vs. Pro
The free plan lets you create one rule per sheet with one condition. This is enough for the most common use case: preventing edits on rows with a specific status. The Pro plan ($5.99/month) unlocks up to 25 rules per sheet, multiple conditions with AND/OR logic, and cross-column comparisons for more complex workflows.
Choosing the Right Approach
Here is a practical decision framework for choosing your protection method:
- If people only need to view data: Share as Viewer. It is free and built in.
- If you need to lock specific columns or rows permanently: Use native sheet and range protection. It is free, reliable, and sufficient for static protection needs.
- If you need to lock rows based on cell values or enforce conditional required fields: Use SheetGuard. It gives you the conditional logic without the complexity of Apps Script.
- If you have highly custom requirements and a developer on your team: Apps Script is an option, but be prepared for ongoing maintenance. Consider whether SheetGuard can cover your needs first, since it handles 90% of conditional protection use cases without code.
Many teams use a combination of these approaches. Native protection handles the static parts (header rows, formula columns), while SheetGuard handles the dynamic parts (conditional locking, required field enforcement). The two work well together because SheetGuard operates at the edit-event level, not at the range-protection level.
Protect Your Sheets, No Code Required
SheetGuard enforces conditional edit restrictions in real time. Set up your first rule in under two minutes with the free plan.
Install SheetGuard FreeNext Steps
If you are managing a shared Google Sheet and native protection is not enough, install SheetGuard and create your first rule. You can also explore our other guides on locking cells based on value and advanced data validation rules for more in-depth coverage of specific use cases.
Have questions? Visit our support page for FAQs and troubleshooting, or contact us directly at vaibhav@aayutech.in.